Please follow the Calibration Checklist to complete your setup of PrintWatch. You may print this document out and complete the checkmarks as you configure your setup.
1.1 Hardware Configuration
There are many ways to configure your hardware to use PrintWatch. There are two basic items you need to run the software:
- Video Capture Device
- Computing Device
- PC or workstations
- Laptop
- Raspberry Pi
- Single Board Computers capable of running OctoPrint with a video feed
Additionally, you need the correct power cable and communication cable to connect to your printer from the computing device.
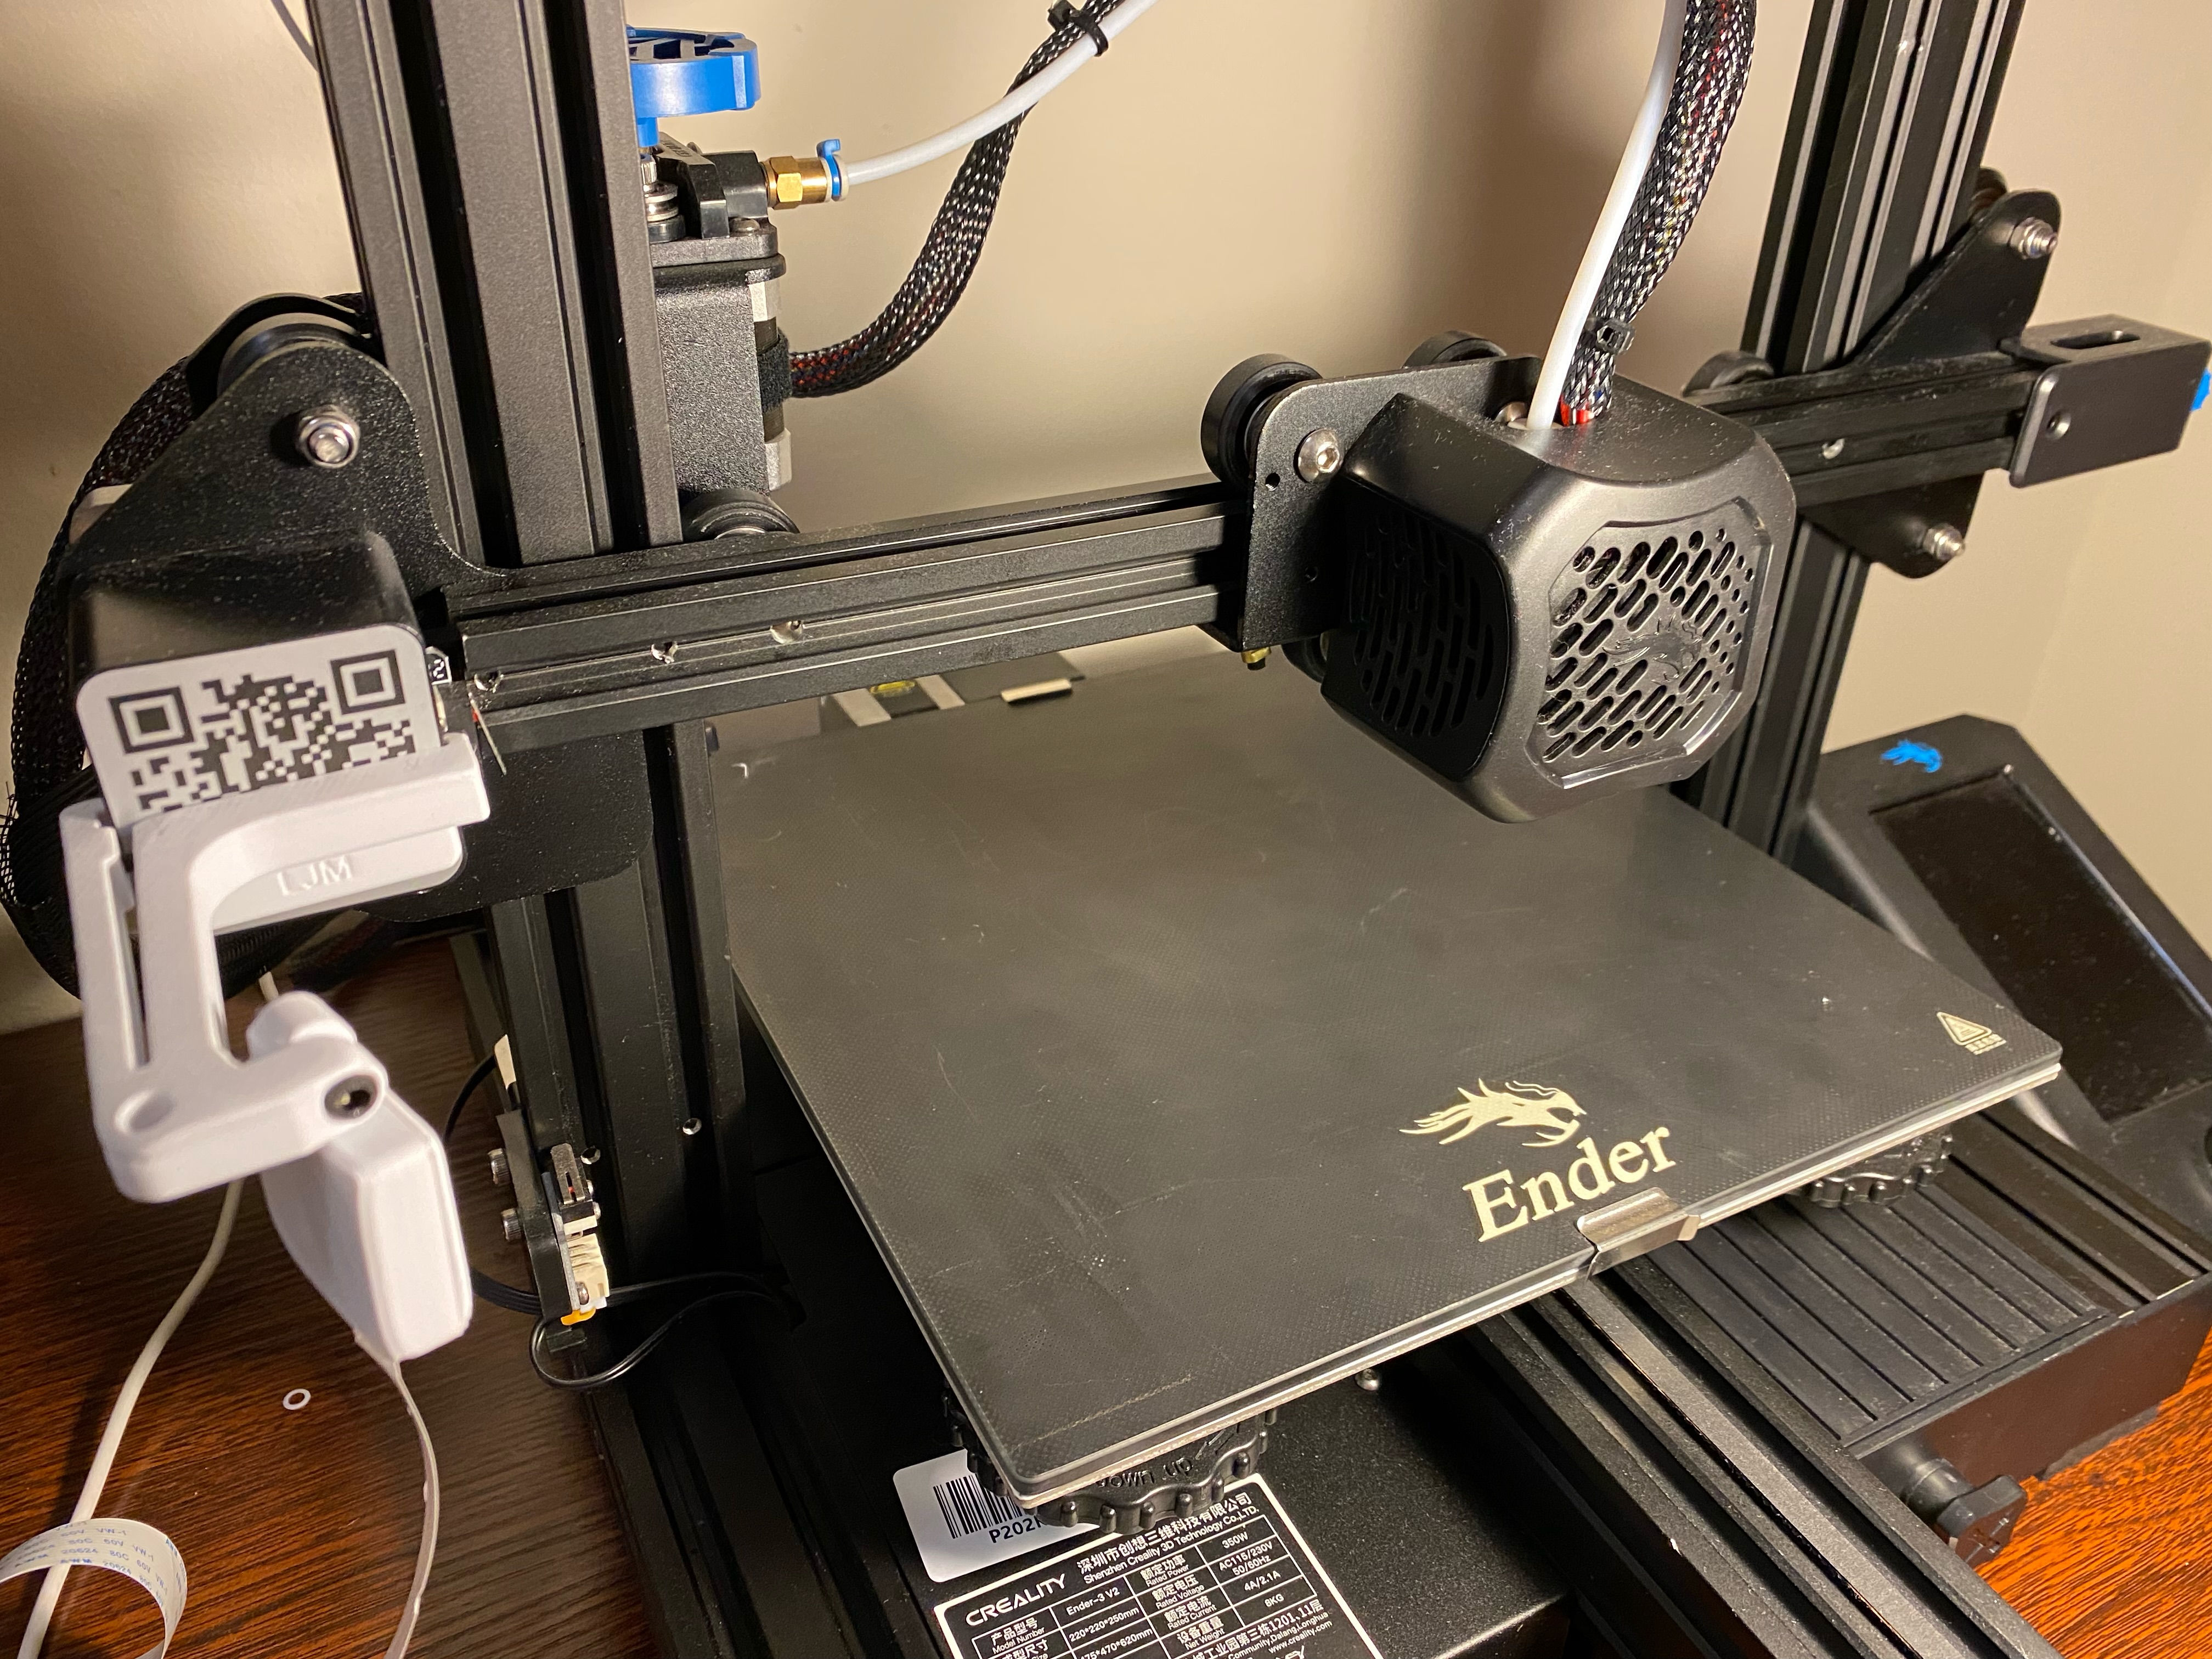
The simplest configuration for running PrintWatch is pictured below:
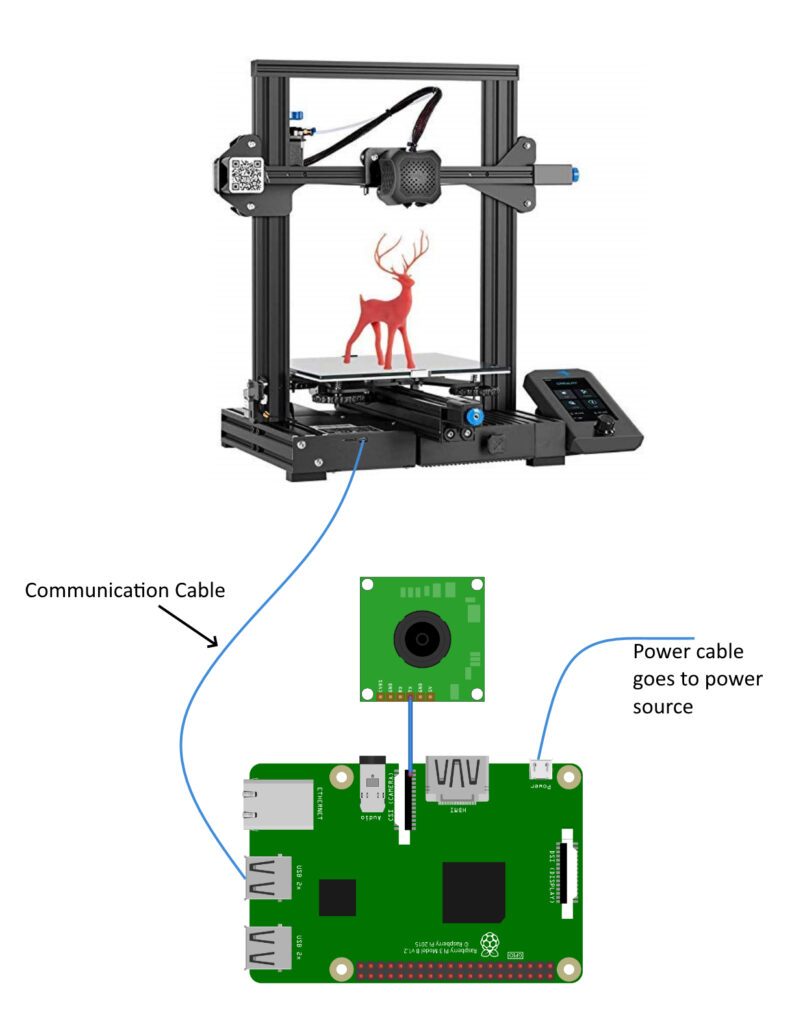
The simple configuration is shown with a Raspberry Pi 4B using a standard Pi Camera. Any capture device can be used as long as it is discoverable by the OctoPrint to be used as the Webcam Stream.
1.2 Camera Configuration
It is highly recommended to use a camera with the minimum resolution of 720p HD (1280 x 720 pixels). Most Raspberry Pi cameras and webcams will meet this minimum resolution. Below is a list of recommended cameras to use with your Raspberry Pi:
Configuring the webcam quality in OctoPrint
OctoPrint defaults the camera resolution to 640 x 480 pixels regardless of the actual quality on the camera. In order to properly setup the camera in OctoPrint, insert the SD card containing the OctoPi image into your computer. Open and edit the octopi.txt file on the SD card. Click here for a reference to working with the SD card for OctoPrint. If you are using a USB camera, edit the lines shown below:
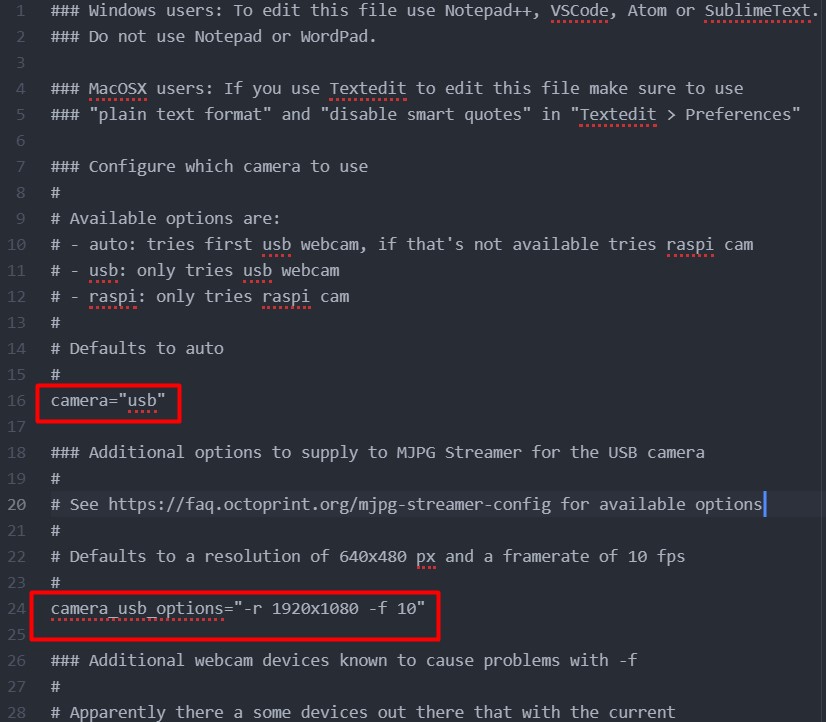
Uncomment the camera option on line 16 and set the value to “usb”, as shown above. Uncomment the USB camera options on line 24 and set the resolution according to your camera’s specification. A 1080p camera running at 10 frames per second is configured above.
When configuring a Raspberry Pi camera, edit the following lines instead:
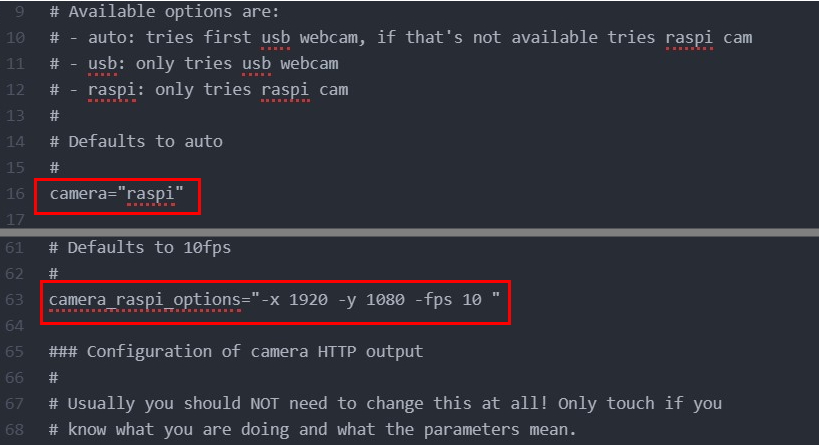
Uncomment and set the camera option to “raspi” on line 16. This indicates that the Raspberry Pi camera should be used. On line 63, uncomment and add “-x” and “-y” followed by that dimension’s resolution. In the example above, a resolution of 1920 x 1080 pixels running at 10 frames per second is specified.
Lighting conditions
It is important to have good lighting on the print bed. The detection model works in various lighting conditions, but if it is too dark or too lit up then it may not perform very well because if cannot see the actual print. It is recommended to install either LED strips or direct some light towards the print bed. Additionally, do not overexpose the print bed with lighting. A strong direct light may cause strong reflections and over-exposure and will result in the AI not being able to see anything, and therefore not detecting anything. An example of what good lighting may look like is shown below:
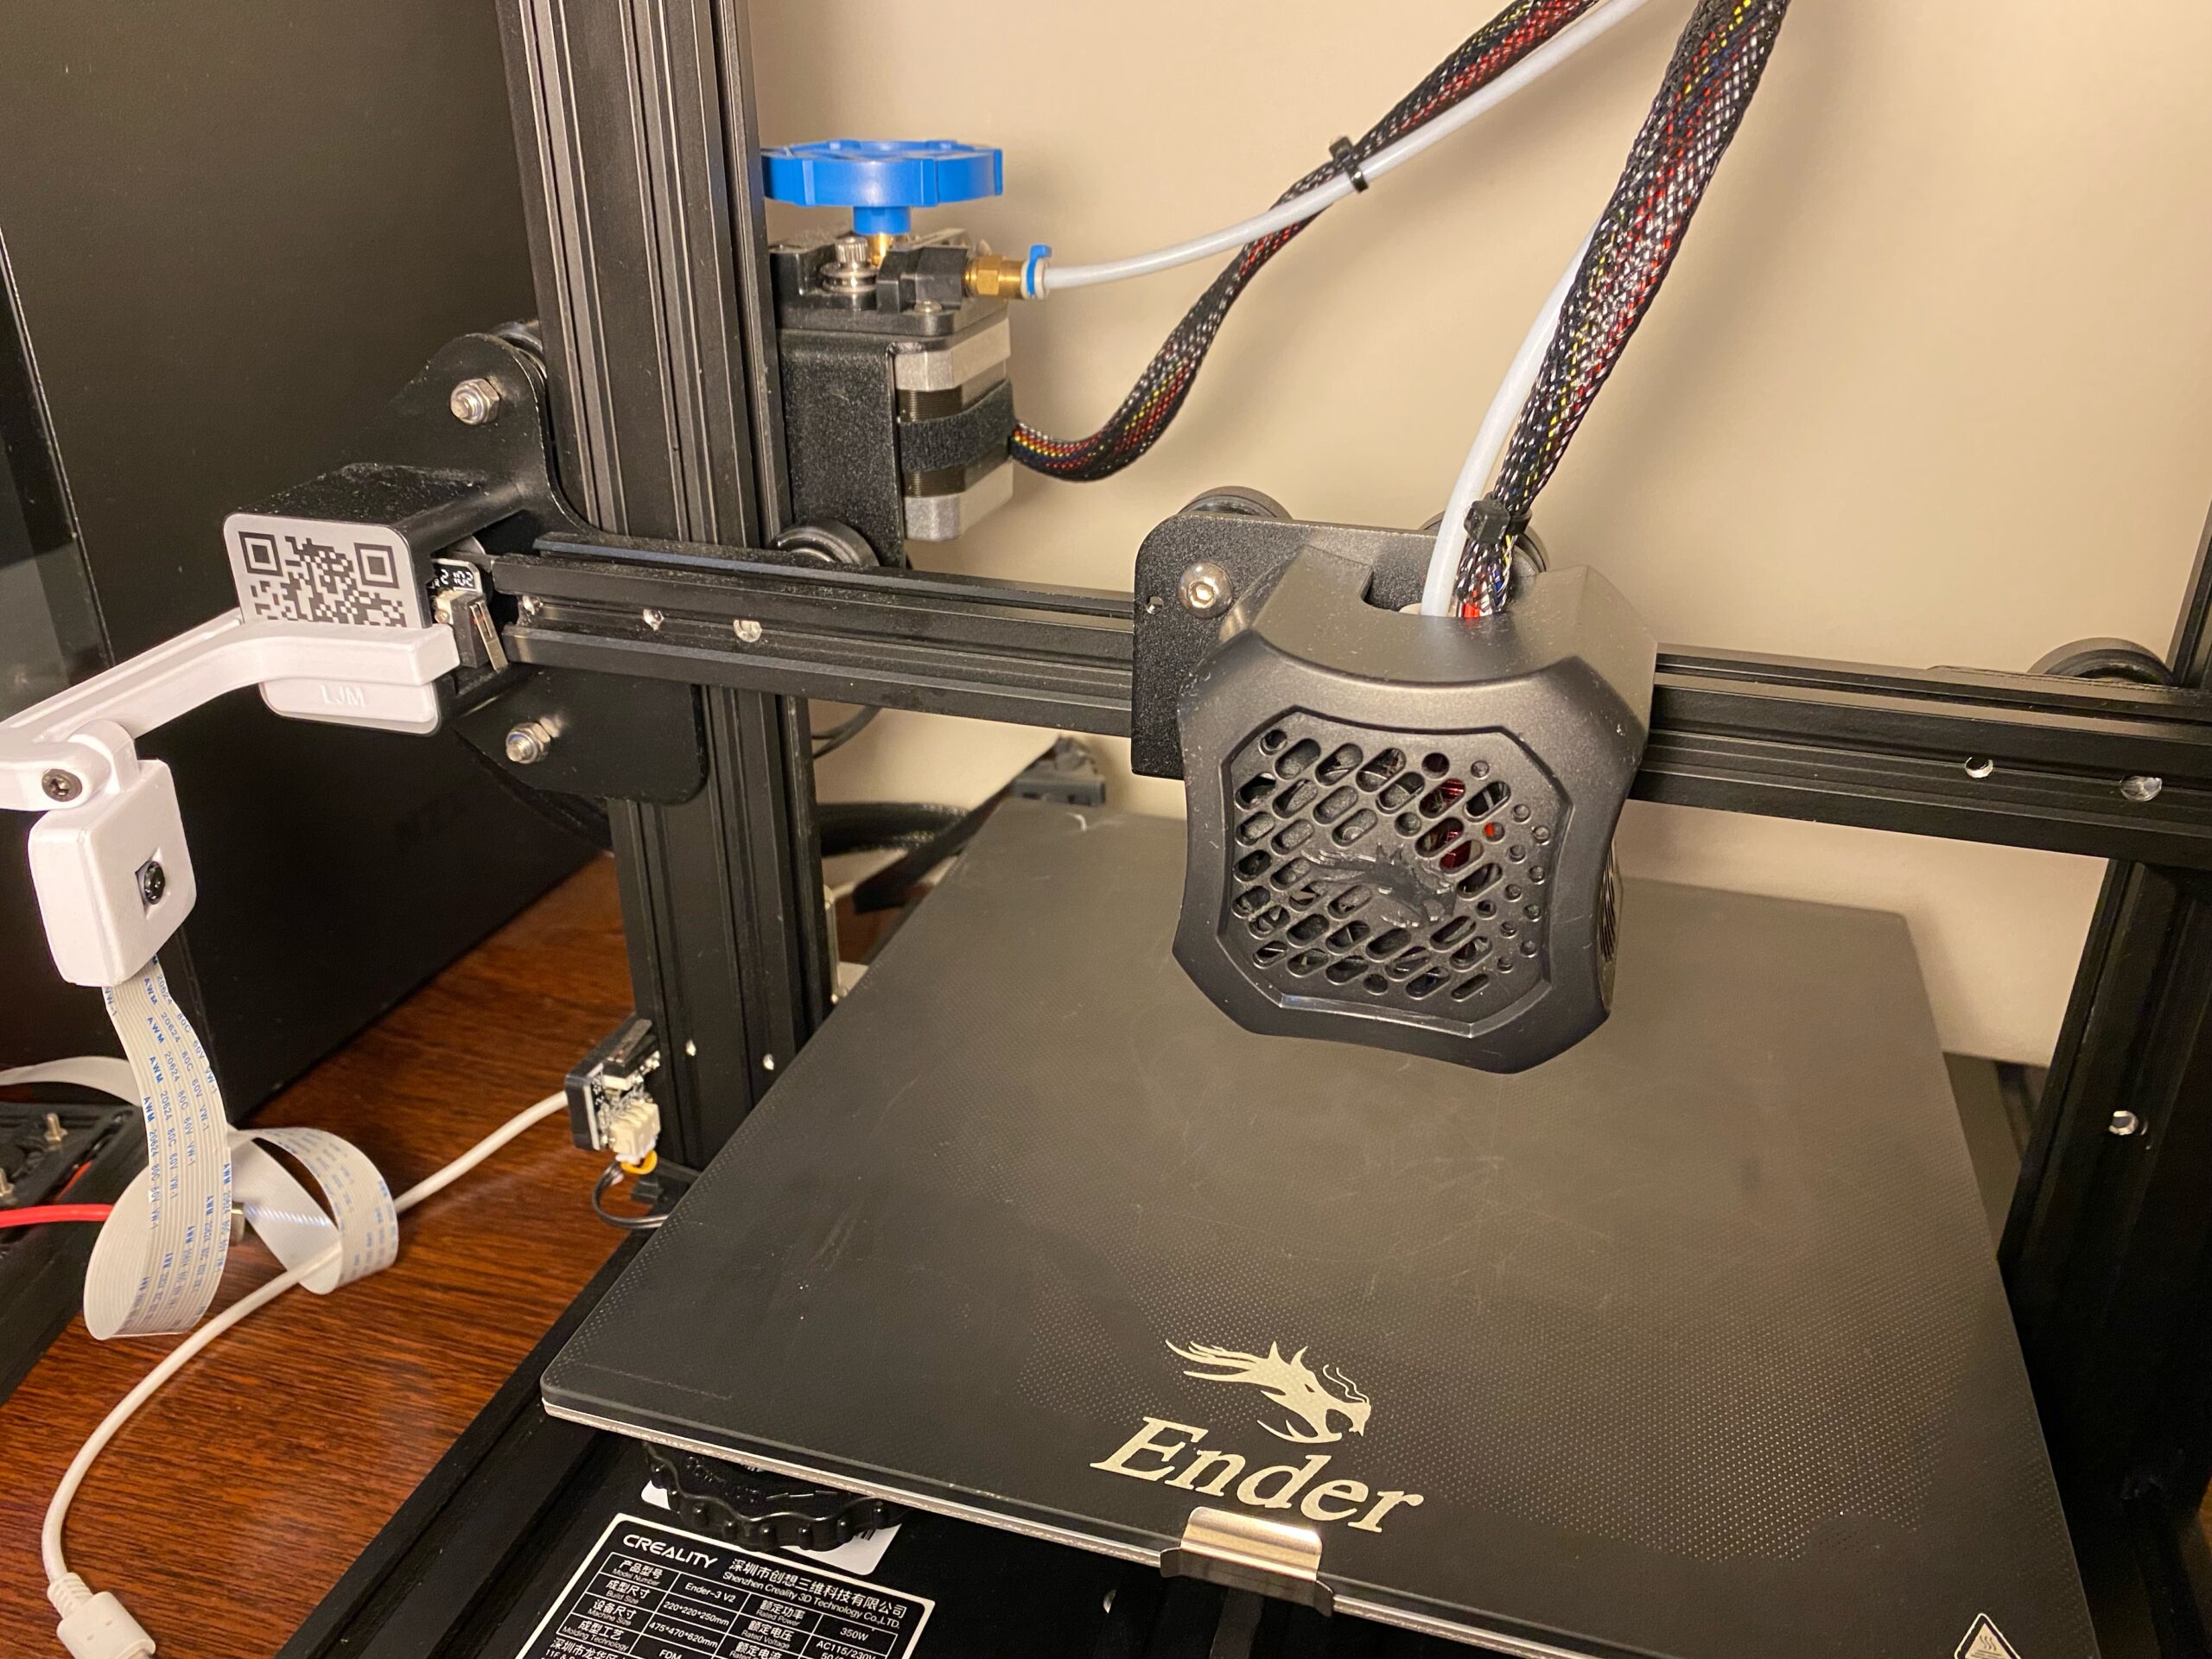
![]() A few reasons why the above image is considered to have good lighting:
A few reasons why the above image is considered to have good lighting:
 The print bed is well-lit and clearly visible
- There are no strong reflections or over-exposure
Camera Position and Location
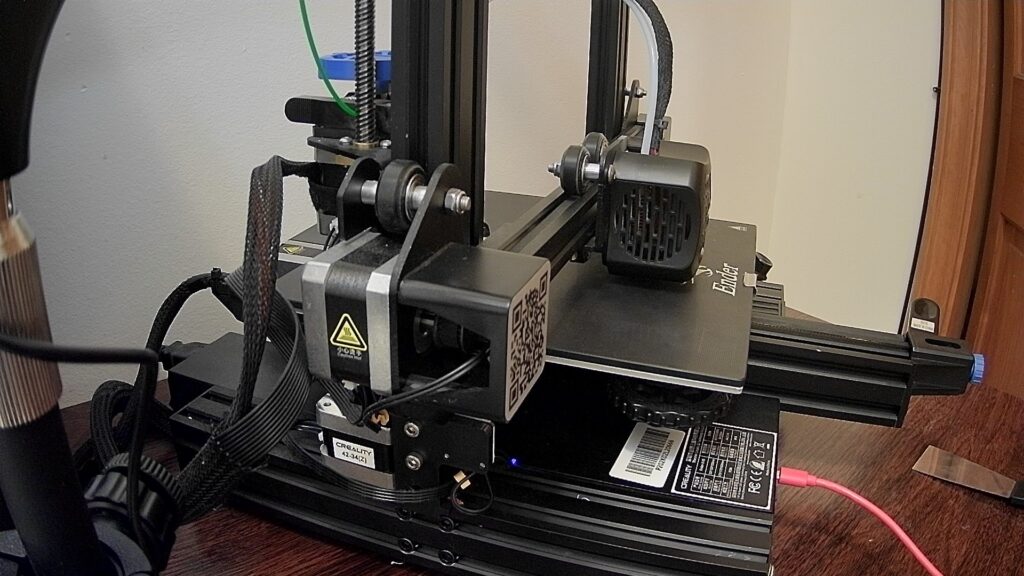
The camera should be setup such that it has a clear and lit-up view of the print. If the camera cannot see the print, then it cannot detect any defects. The camera’s view should not be obstructed by the extruder tool piece or any other part of the printer.
The best spot for mounting the camera is on the front left base extrusion (If using an Ender or similarl printer), otherwise any spot that will have a clear view of the print throughout the entire print job works.
Below are listed a few 3D-printable camera mounts and their links (click on the item to be taken to the download page):
Once you have your camera properly mounted and oriented, ensure that it is focused/calibrated. Each camera varies so you may have to manually focus if there is no built-in auto-focus feature. In some cases the auto-focus feature may actually cause the camera to focus on the wrong region so verify that your camera is focused correctly. The auto-focus is mostly affected when there is an object in the near-field that gets focused on rather than the mid and far-fields, this can commonly happen when the camera is positioned in such a way that one of the print bed’s corners comes near or obstructs the view of the camera.
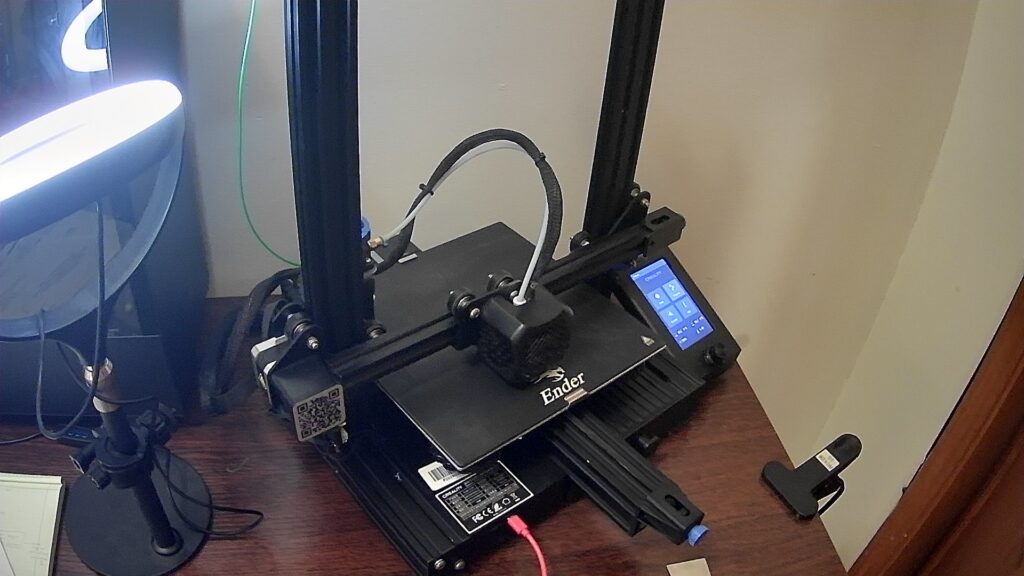
A few good examples of how the camera should be positioned and lit are shown below:
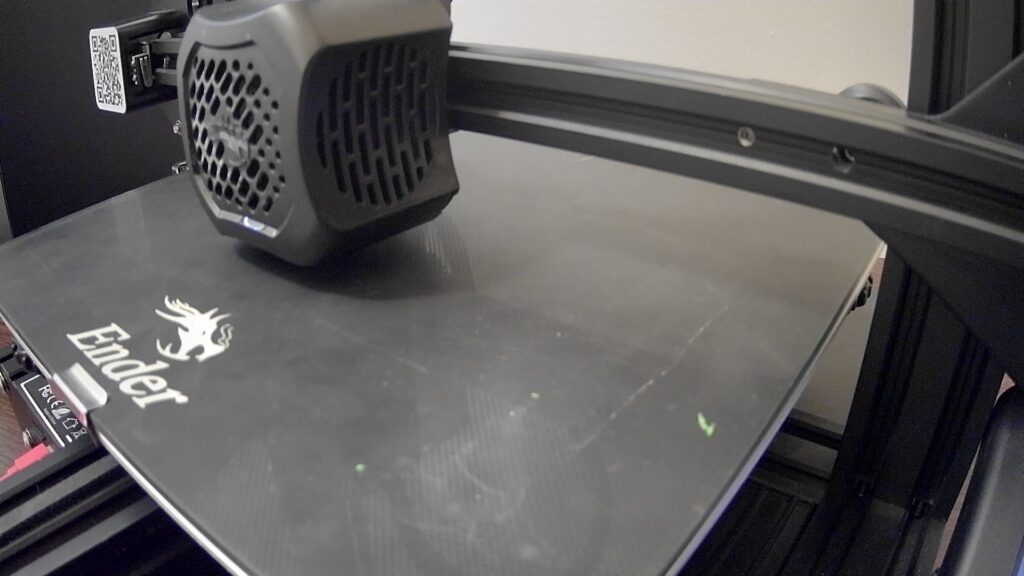
A few things that make these examples “good”:
- The print bed area fills the frame
- The center of the print area is centered in the frame
- The lighting is well lit and not overexposed
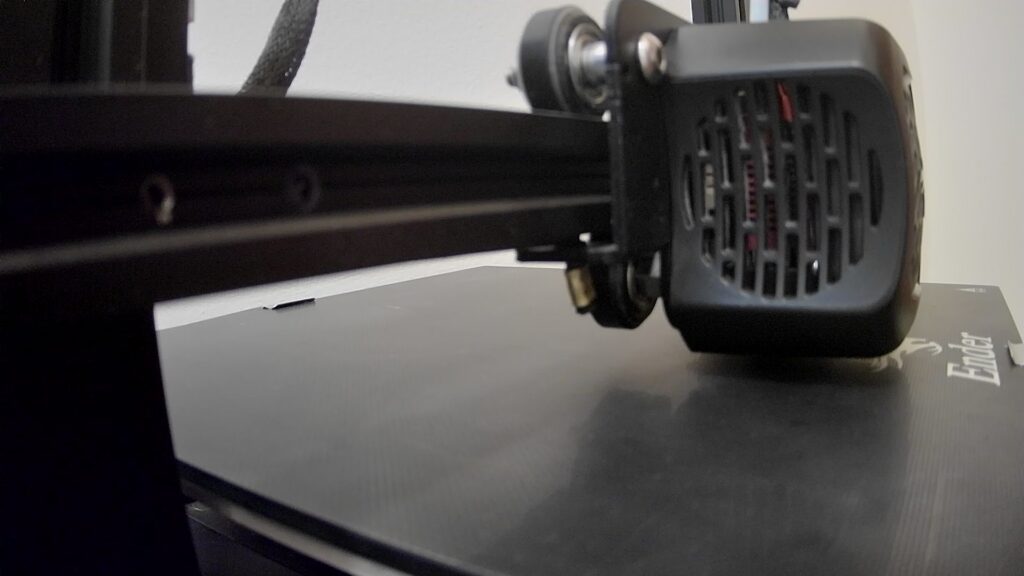
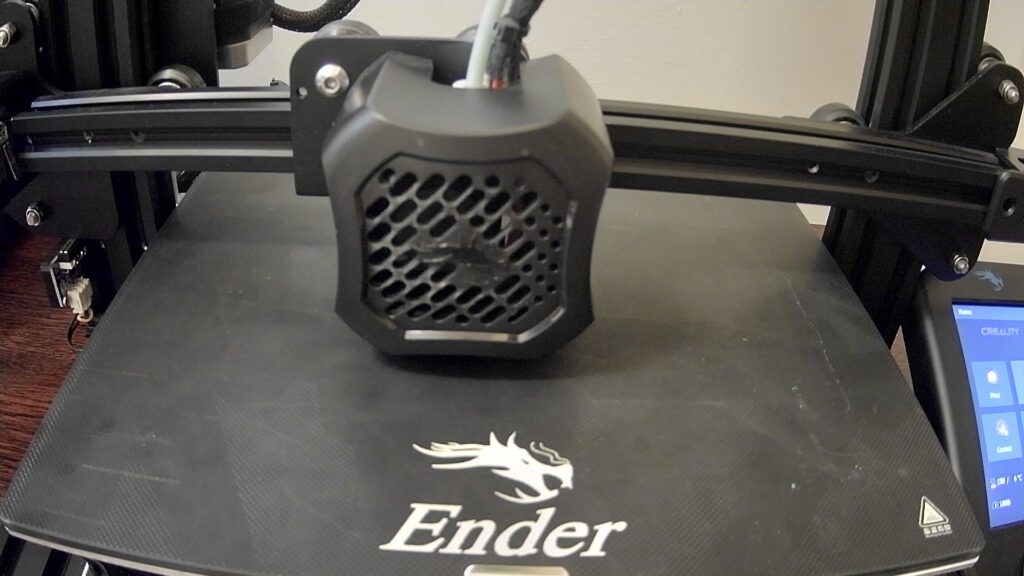
Below are a few examples of bad camera positioning:
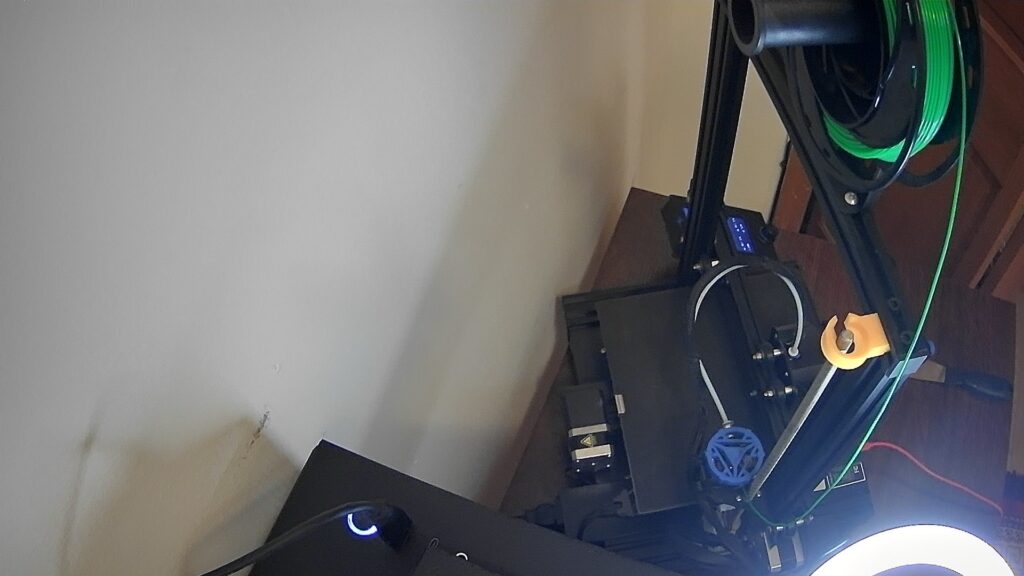
A few reasons why these are “bad” camera angles:
- The print area does not fill up the camera frame
- Random wires and devices in the frame
- View of print bed obstructed
1.3 PrintWatch Settings
1.3.1 Confidence Threshold
Each printer configuration varies, so you can play around with the PrintWatch settings in OctoPrint to get it working the way you want it. This can most easily be done by tuning the ‘Detection Threshold’, ‘Notification Threshold’, and ‘Action Threshold’ settings (shown below):
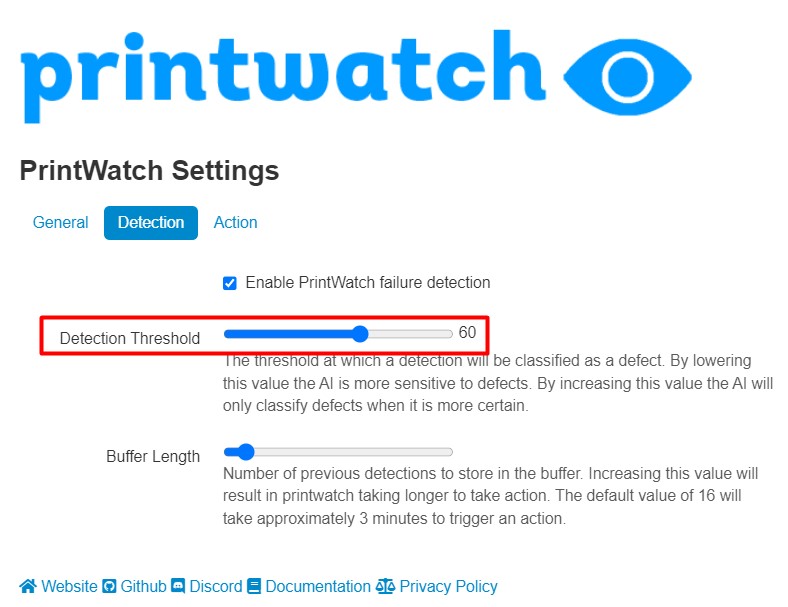
The Detection Threshold defaults to 60, which translates to the model classifying any detections with a confidence above 60% to be classified as defects. If PrintWatch is having trouble catching defects for your setup, try lowering the Detection Threshold and observing the results. Lowering the threshold too much may begin to falsely trigger a shutoff event. It is better for the defect to be caught when it grows larger a few minutes later rather than the print job being falsely stopped. If you are having trouble with the model being triggered too easily, try increasing the Detection Threshold. It isn’t recommended to set to 100 as it will never trigger a shutoff event.
Settings can be changed on the fly and will be updated immediately. Tune your settings while the print job is running with PrintWatch active. To properly tune your confidence threshold value for your printer, follow these steps:
- Begin a print with PrintWatch activated. Enter your settings and leave the confidence at the default value.
- Once the PrintWatch stream preview in the PrintWatch tab of OctoPrint begins, observe the detections.
- If there is an item that is boxed but is not a defect, increase the confidence setting and save your setting (If the item is removable, then remove it or change the camera angle). Observe the stream preview. Continue this process until the item no longer gets boxed as a defect in the preview.
Now, some users may want to run the model as sensitively as possible, in order to do this you want to use the lowest possible confidence setting without triggering false positives. Follow these steps to find the lowest confidence setting that is usable for your printer:
- Begin a print with PrintWatch activated. Enter your settings and leave the confidence at the default value.
- Once the PrintWatch stream preview in the PrintWatch tab of OctoPrint begins, observe the detections.
- Lower the confidence setting and save the settings. Observe the stream preview. Continue this process until false negatives begin to appear.
- Once false negatives appear and are consistently boxed in the preview, increase your confidence setting and save the settings. Continue this process until little to no false positives appear.
1.3.2 Advanced settings
There are two settings that can be modified depending on how sensitively you would like to run PrintWatch. They are described below:
- Buffer Length: This setting controls how many detections are stored in the buffer. The buffer stores each detection as True of False, indicating whether of not a defect was detected, with an input of True meaning that there was a defect detected. By increasing the value of this setting, a few things happen: it takes more time before PrintWatch can begin evaluating whether or not a shutoff event should take place. A shutoff event is only evaluated once the buffer is filled up, so when a print job is started N=Buffer’s Length detections must take place before the conditions for a shutoff event will even be evaluated for. Another thing that happens when the Buffer Length is increased is that it will typically take more time for PrintWatch to take action when an initial defect is spotted. The total time until intervention is determined in combination with the Buffer Percentage setting mentioned below.
- Notification Threshold: This settings determines the threshold at which a notification will be sent to the email input in the PrintWatch settings. Once the Notification Threshold has been exceeded for a period of time equal to 1/2 of the Buffer Length, a notification will be sent.
- Action Threshold: This settings determines the threshold at which an action will be sent to OctoPrint to perform on behalf of your printer. Once the Action Threshold has been exceeded for a period of time equal to 1/2 of the Buffer Length, the action requests will be sent. The Action Threshold by default cannot be less than the Notification Threshold. If you do not wish to receive a notification, disable the Notification setting.
- Buffer Percentage*: This setting sets the percentage of positive detections required in the buffer for a shutoff event to occur. In combination with the Buffer Length this setting allows for the user to tune how quickly and sensitively PrintWatch will trigger a shutoff. The total time for a shutoff to occur can be approximated with the following equation: 10 * Buffer Percentage * Buffer Length, where Buffer Percent is a value from 0.0 – 1.0. The total time is in seconds.
*As of PrintWatch versions 1.1.1 and above, this setting is depreciated. Refer to the Notification and Action thresholds when tuning your setup
Beware of lowering the Buffer Percentage and Buffer Length values too low as this may cause false shutoffs that are very frustrating to deal with. The default settings of Buffer Length=16 and Buffer Percentage=60 are a good starting point, but may not work for every printer configuration or print operation.
The two most important settings to tune are the Notification and Action Thresholds. When determining what values to use, use the following methodology:
- Begin by starting the print and waiting for the AI to begin
- Once the AI has begun monitoring your print, it may take additional time for the score outputs to output properly. Once the scores begin to plot, take note of the baseline value it holds. Use the magenta line as a reference for the average score value. Below is an example of a printer setup that has little background noise and has a baseline value almost equal to 0.
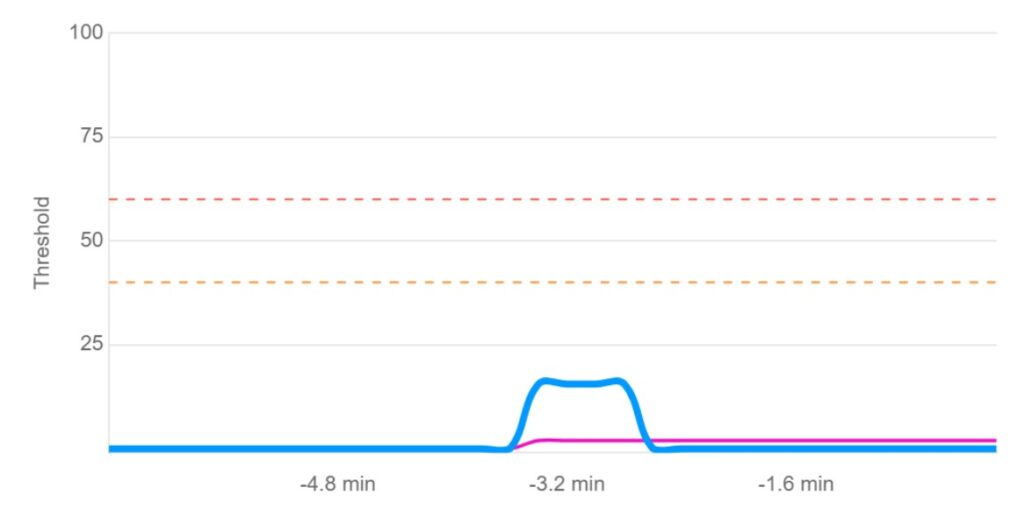
3. Now, introduce a defect into the view of the camera and monitor the plot. The score will initially increase and eventually level out. Use the value that the score has levelled out to as a reference to set your Notification and Action Thresholds. If the value that the score levels out to is 80, then a reasonable Action Threshold may be 60 or 70. Anything more than 75 and it may take longer to initiate action on behalf of the printer. A reasonable Notification Threshold may be 30 or 40 since the baseline value appears to be less than 5. Beware not to set the values too aggressively or too passively as either may produce undesirable results.
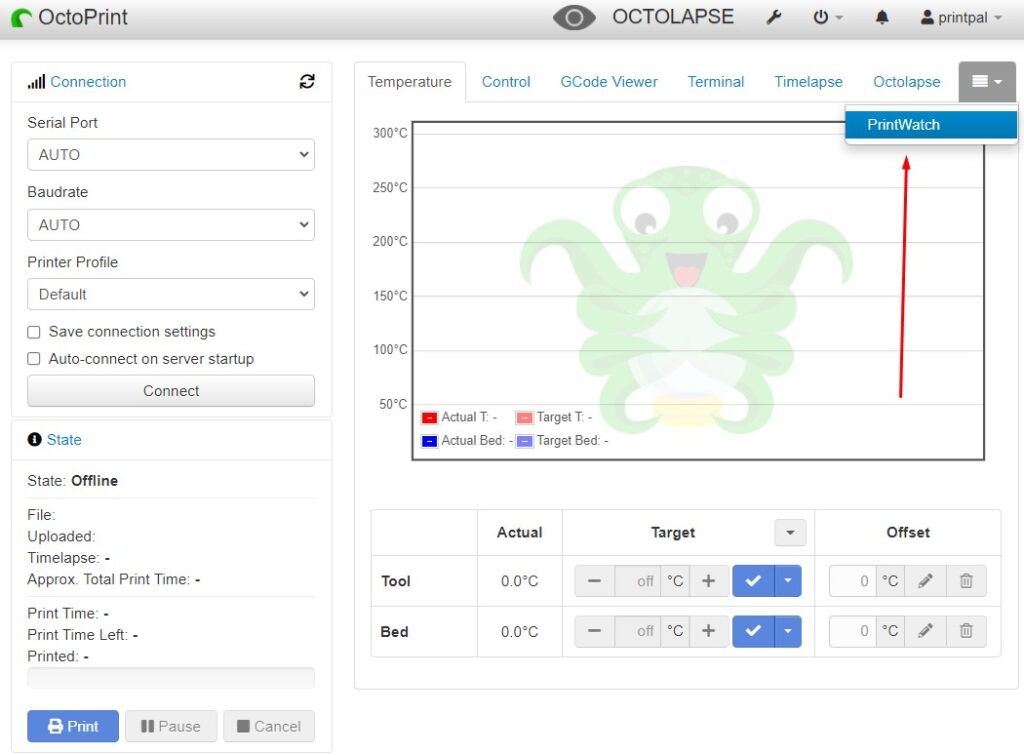
1.4 PrintWatch Tab
The PrintWatch tab provides you with feedback from the detection model. You can find it on the OctoPrint main page in line with the Temperature, Control, and GCode Viewer tabs. You may have to click on the stacked dropdown icon to access it if you have too many tabs (shown below):
Once you are on the PrintWatch tab, a stream preview will be shown. This preview shows the current detections on the latest analyzed frame. Use this feature to tune your setup and see what confidence threshold values detect the defects well for you. The stream preview starts roughly after 5 minutes into the print job. The PrintWatch tab is shown below for reference:
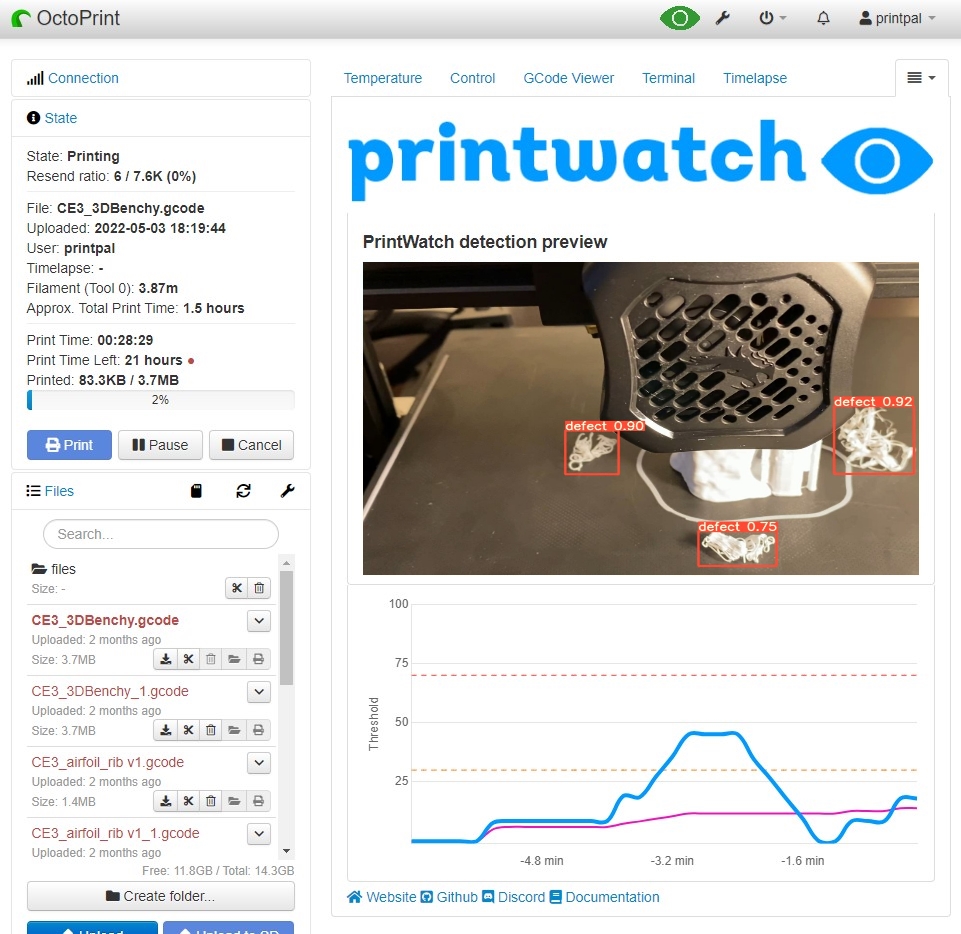
The PrintWatch preview is a great tool for visualizing what the Machine Learning model is seeing. Use it to select your confidence threshold, notification thresholds, and action thresholds for various prints.
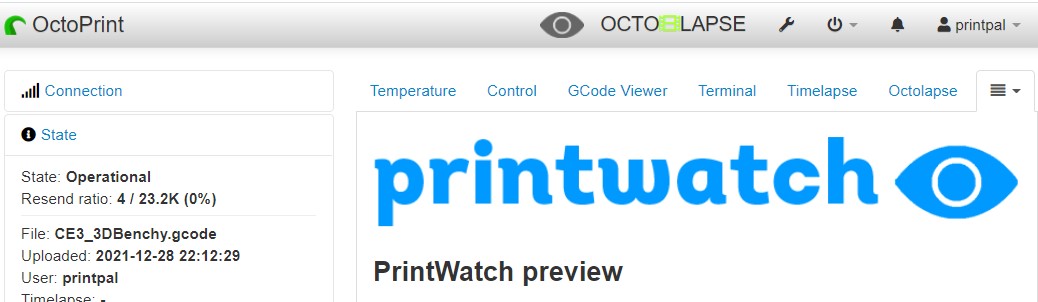
1.5 PrintWatch status indicator
The PrintWatch status indicator is displayed on the top navigation bar of OctoPrint’s WebUI. It is the same eye icon as the PrintWatch logo. It provides the user with feedback on whether PrintWatch is active and running. When PrintWatch is not actively monitoring your prints, the indicator is a static grey (shown below):
When PrintWatch is actively monitoring your prints for defects, the indicator is flashing green (shown below):
![]()