All resources

About this video

Video by Vitek Innovation: Instagram Profile

What Are Wave Overhangs in 3D Printing?

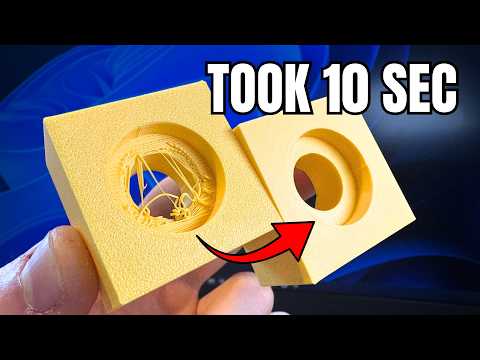
Wave Overhangs is an experimental, community-built feature for Orca Slicer that lets you print 90-degree overhangs without support structures. Instead of relying on traditional support material, the slicer generates a wavy toolpath that prints each new layer right next to the previously extruded bead, then "squishes" the next layer on top of it. The result is a fully supportless print with surprisingly clean surface finish on the underside.

How to Install Orca Slicer Wave Overhangs

Because this is a community build, the feature is not in the official Orca Slicer release. Follow these steps:

  • Visit the project page linked in the video description and download the Orca Slicer Wave Overhangs build.
  • Pick the correct installer for your OS — Windows, macOS, or Linux are all available.
  • Run the installer. Windows may flag the app as unrecognized because it is community-built. Click More info → Run anyway to proceed safely.
  • Place the app wherever you like (the desktop works fine) and launch it.

Enabling the Wave Overhangs Setting

Once the slicer is open, the process is genuinely a single toggle:

  • Open your model in the new build.
  • Navigate to the new Wave Overhangs section in the settings panel.
  • Click the enable button — that's it.
  • Re-slice your model and the slicer will produce a support-free toolpath for any overhang up to 90 degrees.

Wave Overhangs is slow on purpose. Keep these settings in mind:

  • Print speed: Expect around 2 mm/s for the affected layers. This is non-negotiable for the technique to work.
  • Part cooling fans: Run them at 100% constantly. The filament must solidify almost instantly before the next bead is laid down.
  • Surface finish: Because the layer is squished against an already-solidified neighbor, the underside comes out smoother than most support-break-away finishes.

Why the Wave Overhangs Technique Works

The slicer prints each overhang bead parallel to (and touching) the previous layer rather than bridging across empty air. The new extrusion bonds to the cold, hardened bead beside it instead of sagging into mid-air. Aggressive cooling locks each layer in place before the next one arrives, preventing droop and producing a clean, supportless surface.

Frequently Asked Questions

Is Wave Overhangs safe to install?
Yes — it is an open-source community fork of Orca Slicer. The Windows SmartScreen warning is expected and can be bypassed via "More info → Run anyway."

Will it work on any 3D printer?
It works with any printer supported by Orca Slicer, though printers with strong part-cooling fans (Bambu Lab, Voron, Prusa, Ender upgrades) produce the best results.

When will it be added to the official slicer?
It is still experimental, so expect more refinement before official integration.

Can I still use regular supports alongside it?
Yes — you can mix and match. Wave Overhangs only activates on qualifying overhang geometry.
Full Transcript

if you would like to stop using supports and start printing overhangs at 90 degrees just like this 3D printer it's actually really easy and it takes just a single setting but we need to do the setup for this setting because it isn't in the official slicer so today in this video I'm gonna walk you through the steps it's really easy but I'm not gonna be doing any editing so that you can see the problems that may happen during the install because it is just a community build up so I will show you exactly how it's done so I will put the link to this page into description you need to go to this because we need to download this orca version so it's an orca slicer version which is called orca slicer wave overhangs once we have this page right in front of us as you can see there's a lot of files but we can skip over all of these files and just go down here where is the download button you will click on the download button and once you click on it as you can see right over here there are three versions that you can download I have Windows so well there are more versions but of course we are only picking from Windows Mac or Linux so pick the one that you have and download it I have completely uninstalled the app from my computer so that you can see the problem that may happen because it's a community built app Windows doesn't really like opening these kinds of apps so I will show you how we can completely avoid that because it's safe I tested it myself so you can use me as a bit of a test rabbit so once it downloads as you can see right over here on the top you just click on it and now Windows will show you this message right over here which just means that Windows doesn't know who it is of course it was built by the community so you just click on more info as it was right there and then just click on run anyway once you click on it it will give you probably another warning which just says exactly the same so just allow the app to make changes on your computer which just means it will be installed so then you have the basically slicer set up there so just put the file or the app wherever you want it I put it on my desktop once that starts installing of course this feature is really useful because it will enable us to remove completely the need for using supports right because that's amazing nobody likes wasting materials on support but it's still just an experimental one so I would say that it will take some time before it gets into the official slicers but if you want to be a bit of a early bird and use this feature even now and get used to using it and be a bit more experienced this is an amazing opportunity so once it is set up it will automatically be on your desktop it's a completely new version of orca so you just need to click on it once you click on it it will open for you I already did a test print so it probably has as you can see already my test print saved but right now as you can see this would normally need support right but now as you see in the settings there's a completely new section which is called Wave Overhangs so once you click on it you just need to click on this single button and the wave overhangs are enabled so now when you slice it it actually doesn't need any supports and it can print this completely without them and of course there is a lot more settings that we could go through but the only thing that I would make you basically understand or I would understand myself is the print speed you need to pay attention to this because it is super slow 2 millimeters per second that is really slow and why is that well because the layer or how it works is that it basically squishes the next layer on top of the other as you can see in the animation right over here as you can see it is basically printing the layers but it doesn't have anything under it which we would seem as impossible right there's nothing under it so what is it printing on but it basically is printing right next to the layer that it already created but to be able to solidify the filament fast enough it needs to be printing extremely slow and have all of the fans running constantly so if you enable this feature don't be surprised when the fans will sound crazy because it is doing that to cool down the filament enough so that if when it basically meets with the filament that is already there on the 3D print it is already solidified so that it solidifies as fast as it possibly can so that it wouldn't basically be still hot enough or warm enough to suck which would then create the ugly surface down below and I was very pleasantly surprised myself what kind of a surface finish it had and so I think this is an amazing feature that enables us to have um supportless prints so hopefully this was a bit helpful this is how you enable the feature if you would like me to go a bit deeper into the settings or anything any questions drop them in the comments this was just a quick tutorial hope it helps and yeah