About this video
Why 3D Print a Custom Organizer?
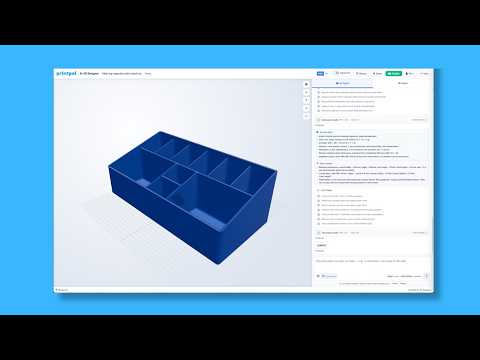
Off-the-shelf organizers rarely fit the exact dimensions of your drawer, tool chest, or desk tray. A custom 3D printed organizer solves that problem by letting you dial in the precise length, width, height, and compartment layout you need. The video walks through a simple workflow using a free browser-based custom storage generator, making it accessible even if you have zero CAD experience.
How to Make a Custom 3D Printed Organizer
- Open the generator website and navigate to the Tools menu.
- Select the Custom Storage Generator from the list of available tools.
- Adjust the sliders on the right-hand panel to set your overall tray dimensions — outer length, outer width, and overall height.
- Configure the internal grid by choosing how many columns and rows you need, and fine-tune individual compartment sizes for irregular items like screwdrivers, makeup brushes, or soldering bits.
- Toggle useful add-ons such as a stacking feature (so multiple trays lock together vertically) and floor holes (which reduce filament usage and print time by removing the solid bottom layer).
- Download the STL or 3MF file and slice it in your preferred slicer (Cura, PrusaSlicer, OrcaSlicer, Bambu Studio, etc.).
- Print on any FDM or SLA printer. PLA or PETG works well for most household organizers.
Tips for Better Prints
- Use floor holes for large trays to cut print time by 20–40% and save material.
- Enable the stacking feature if you want modular, expandable storage that locks together without clips.
- Print with a brim for wide trays to prevent warping at the corners.
- Orient compartments open-side up so you only need minimal support material.
- Scale up or down freely — the generator lets you organize at any scale, from a tiny electronics parts tray to a full drawer insert.
Frequently Asked Questions
Do I need CAD skills?
No. The custom storage generator uses sliders and toggles, so no modeling experience is required.
What file format do I download?
Most generators export STL, which is compatible with every modern slicer and 3D printer.
Can I make round compartments?
Many versions of the tool support circular cutouts for items like lipsticks, batteries, or pens.
What printer settings should I use?
A standard 0.2 mm layer height, 3–4 perimeters, and 15–20% infill is a solid starting point for most organizers.